Classic Walnut Step Stool with Dowel-Joined Base
An intermediate hardwood step stool with a glued solid-wood top, laminated walnut legs, dowel-joined stretcher base, rounded edges, movement-friendly top attachment, and rubber feet for stability.
Furniture · Intermediate · 6–8 hours plus glue and finish cure time
Tools
- Tape Measure
- Pencil
- Drill
- Dowel Jig
- Miter Saw
- Table Saw
- Circular Saw or Track Saw
- Router or Trim Router
- 3/8 in Roundover Bit
- Random Orbital Sander
- Combination Square
- Clamps
- Chisel Set
- Mallet
Cut list
- Top panel board A — 1 × 12 in x 5-1/2 in x 3/4 in Walnut
- Top panel board B — 1 × 12 in x 5-1/2 in x 3/4 in Walnut
- Leg lamination pieces — 8 × 8 in x 1-1/2 in x 3/4 in Walnut
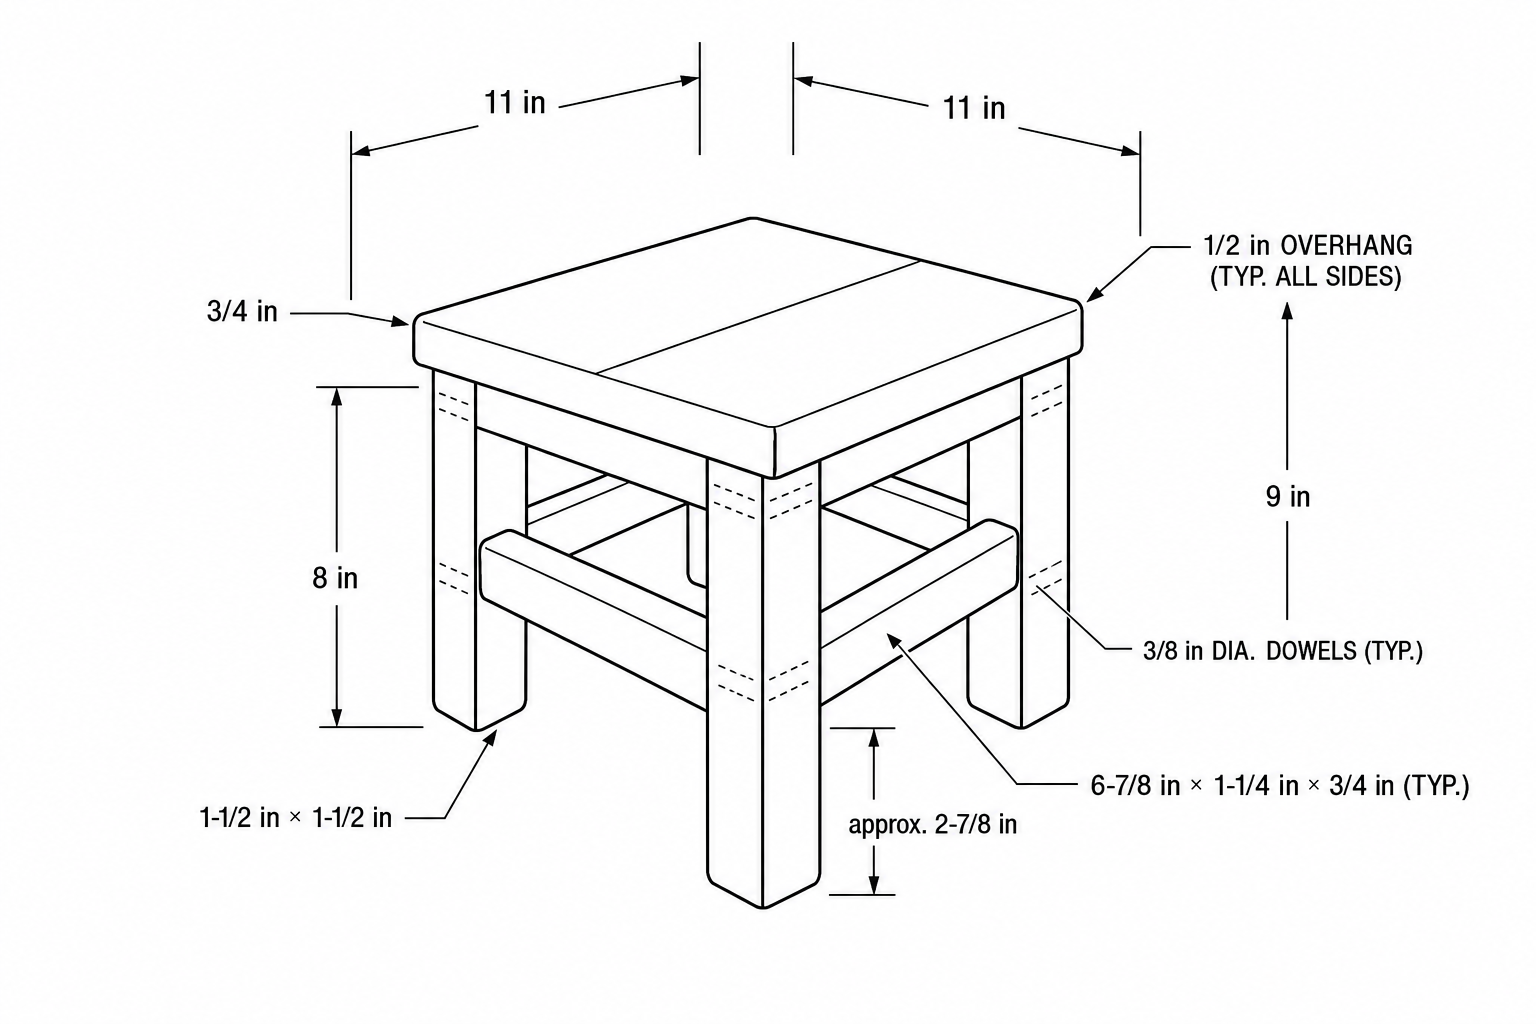
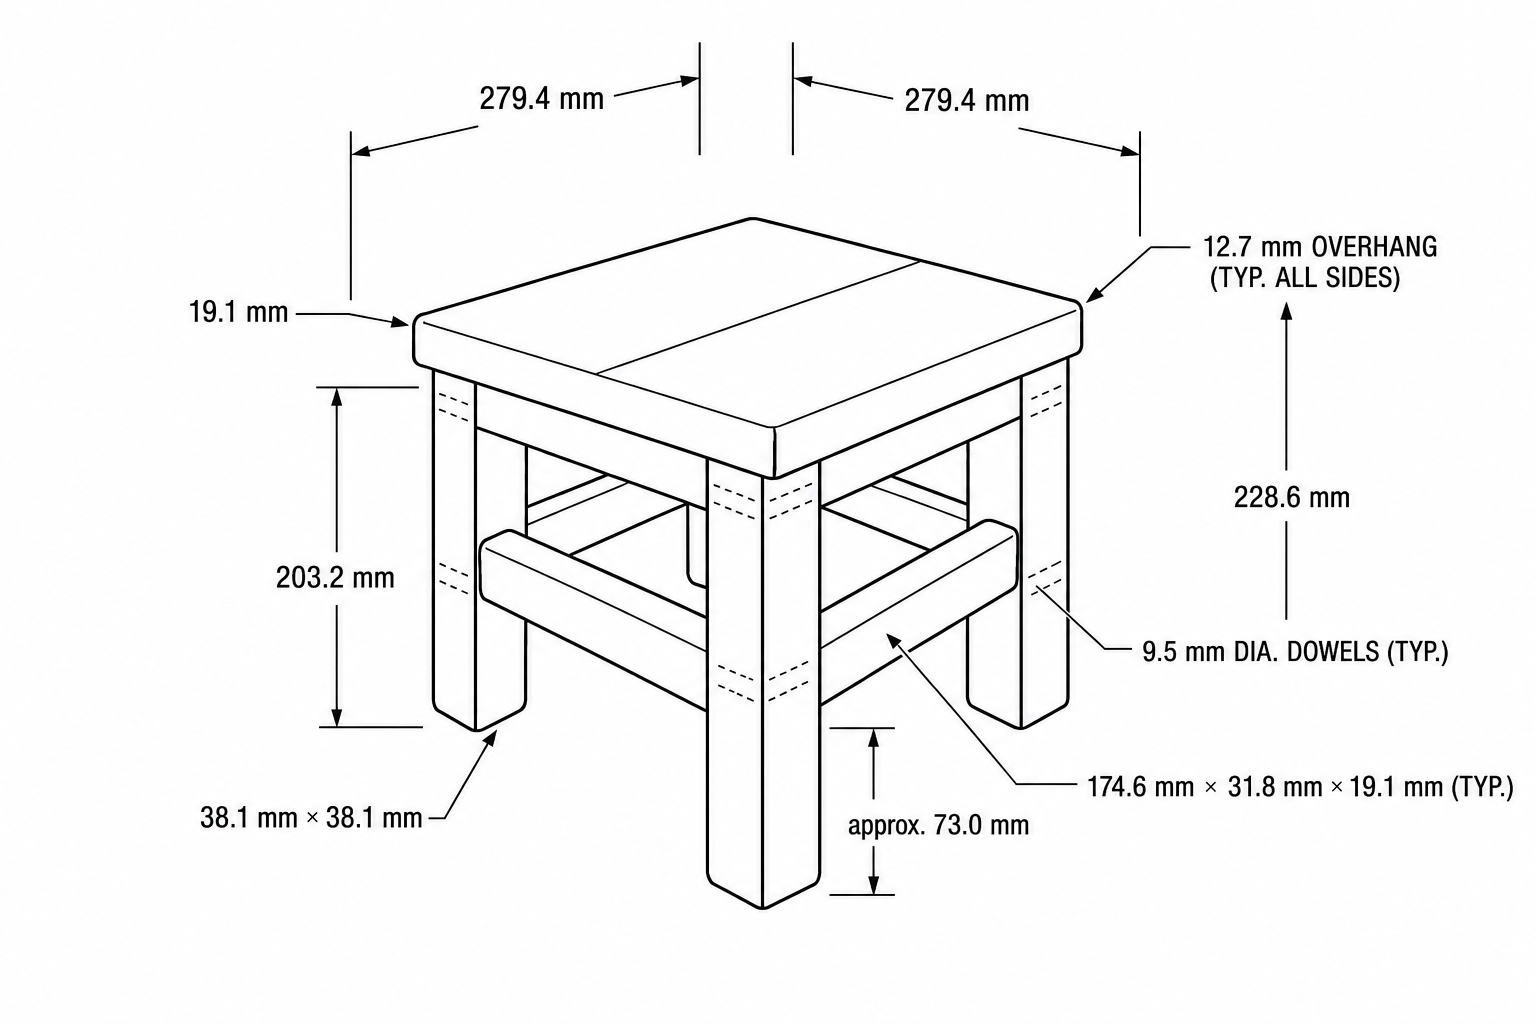
- Finished legs — 4 × 1-1/2 in x 1-1/2 in x 8 in Walnut
- Stretchers — 8 × 6-7/8 in x 1-1/4 in x 3/4 in Walnut
- Dowels — As required × 3/8 in diameter Hardwood
- Rubber feet — 4 × Sized to fit leg bottoms Rubber
Diagrams
Build steps
Prep: Lay Out Parts and Mark Reference Faces
1. Choose the straightest walnut boards for the top, legs, and stretchers. 2. Mill rough lumber to 3/4 in thick using the jointer, planer, and table saw if needed. 3. If using premilled stock, confirm thickness and skip directly to layout and cutting. 4. Mark one reference face and one reference edge on every part. 5. Label parts clearly before cutting or drilling.
Cutting: Prepare the Top, Leg Blanks, and Stretchers
1. Rip a 1-1/2 in wide strip of walnut long enough to create the leg lamination pieces. 2. Cut eight leg lamination pieces to 8 in long. 3. Glue the leg pieces into pairs to create four finished leg blanks. 4. Cut all eight stretchers to 6-7/8 in using a stop block on the miter saw. 5. Cut the two top boards to 12 in x 5-1/2 in x 3/4 in.
Top: Glue Up the 12 in x 11 in Panel
1. Select the two cleanest mating edges for the top glue-up. 2. Test clamp the boards first to confirm a tight glue line. 3. Apply an even bead of wood glue along one mating edge. 4. Clamp the two boards into a 12 in x 11 in panel. 5. Use even clamp pressure and avoid bowing the panel. 6. Let the panel cure fully, then scrape or sand away squeeze-out.
Cutting: Final-Size the Top and Base Parts
1. Trim the glued top to a final 11 in x 11 in size. 2. Clean up the laminated leg blanks to 1-1/2 in x 1-1/2 in x 8 in. 3. Confirm all eight stretchers are exactly 6-7/8 in long. 4. Check every cut end with a combination square. 5. Sand the top glue line flush and remove sharp splinters before joinery layout.
Joinery: Lay Out Dowel Locations
1. Mark upper and lower stretcher locations on the inside faces of all four legs. 2. Carry layout lines onto the matching stretchers. 3. Use these lines to align the dowel jig consistently. 4. Position the lower stretchers approximately 2-7/8 in from the bottom of the legs. 5. Keep adjoining dowel holes offset so they do not intersect inside the legs.
Joinery: Drill Dowel Holes
1. Drill the stretcher end holes first using a dowel jig. 2. Keep the bit centered in the 3/4 in stretcher thickness. 3. Use a depth stop or tape on the drill bit for consistent hole depth. 4. Transfer the locations to the matching leg faces and drill from the marked reference faces only. 5. Test-fit the first few joints before drilling every part. 6. Clamp narrow parts before drilling so they cannot spin.
Assembly: Glue Up Two Side Frames
1. Glue one side frame at a time using two legs and the matching upper and lower side stretchers. 2. Brush glue into the dowel holes and lightly onto the dowels. 3. Clamp each frame just enough to seat the joints fully. 4. Check each frame for square before tightening the clamps. 5. Clean squeeze-out from inside corners while the glue is still wet. 6. Let both side frames cure in clamps.
Assembly: Join the Full Base
1. Connect the two side frames with the remaining front and back stretchers. 2. Use the same glue-and-dowel process. 3. Add clamps in both directions so the base pulls together evenly. 4. Measure diagonals across the top of the base and adjust until both match. 5. Set the base on a flat surface before the glue cures and check for rocking. 6. Let the base cure fully before shaping.
Refinement: Rout Roundovers and Sand Smooth
1. Flush any proud joints with a sander or chisel. 2. Use a router with a 3/8 in roundover bit on all exposed top edges and outside leg edges. 3. Round over the underside edges of the top as well. 4. Stop short of tight inside corners if needed and blend those areas by hand. 5. Keep the router moving to avoid burn marks in walnut. 6. Sand through 120, 150, 180, and 220 grit.
Top Attachment: Install Movement-Friendly Fasteners
1. Center the base under the 11 in top so the overhang is 1/2 in on all four sides. 2. Mark the base location on the underside of the top. 3. Install four figure-eight fasteners or tabletop fasteners near the upper stretchers. 4. Drill recesses only as needed so the fasteners sit flat and can pivot slightly. 5. Fasten the top securely without locking it rigidly across its width.
Finishing: Apply Finish and Add Rubber Feet
1. Remove dust from the top, legs, and stretcher corners. 2. Apply hardwax oil, penetrating oil, spray-on lacquer, or clear polyurethane. 3. Follow the product instructions for drying and curing time. 4. Install one rubber foot centered under each leg. 5. Set the stool on a flat floor and verify there is no wobble before use.
Safety notes
- Always wear eye protection, hearing protection, and a dust mask or respirator during cutting, sanding, or routing to maintain health and safety.
- Review the entire plan beforehand to verify all measurements, material sizes, and tool setups to prevent errors.
- Use clamps, push sticks, and secure work setups to safely operate each power and hand tool; never bypass guards or safety features.
- Avoid tool operation when tired or distracted, and seek help if unfamiliar with any tool or procedure to maintain safety.
- Your skill level allows use of your diverse tools, but always remain cautious and prioritize safety to avoid injury.
Finishing suggestions
- Use a penetrating oil for a warm, natural walnut look with easy touch-up.
- Use hardwax oil for better wear resistance while keeping a low-sheen hand-rubbed appearance.
- Use spray-on lacquer or clear polyurethane for a more protective film finish.
- Test the finish on an offcut first because walnut can deepen significantly in color.
- Allow the finish to cure fully before putting the stool into regular use.