Modern Textured Pine Entryway Bench
An intermediate pine entryway bench featuring a routed textured surface, dado joinery, and a slatted lower shoe shelf.
Furniture · Intermediate · 1 full day plus finish drying time
Tools
- Tape Measure
- Pencil
- Drill
- Impact Driver
- 18-Gauge Brad Nailer
- Miter Saw
- Clamps
- Router
- Router Texture Jig and Fence
- 1/2 in Cove Bit
- 3/4 in Straight Router Bit
- Random Orbital Sander
- Combination Square
- Speed Square
- Straightedge
Cut list
- Top panel — 1 × 30 in W x 9-1/4 in D x 1-1/2 in thick Pine 2x10
- Left side panel — 1 × 16-1/2 in H x 9-1/4 in D x 1-1/2 in thick Pine 2x10
- Right side panel — 1 × 16-1/2 in H x 9-1/4 in D x 1-1/2 in thick Pine 2x10
- Bottom shelf slats — 4 × 19-3/4 in L x 1-1/2 in W x 3/4 in thick Pine 1x2
- Dowel plugs — 4 × 5/16 in diameter x approximately 3/8 in long Hardwood dowel
Diagrams
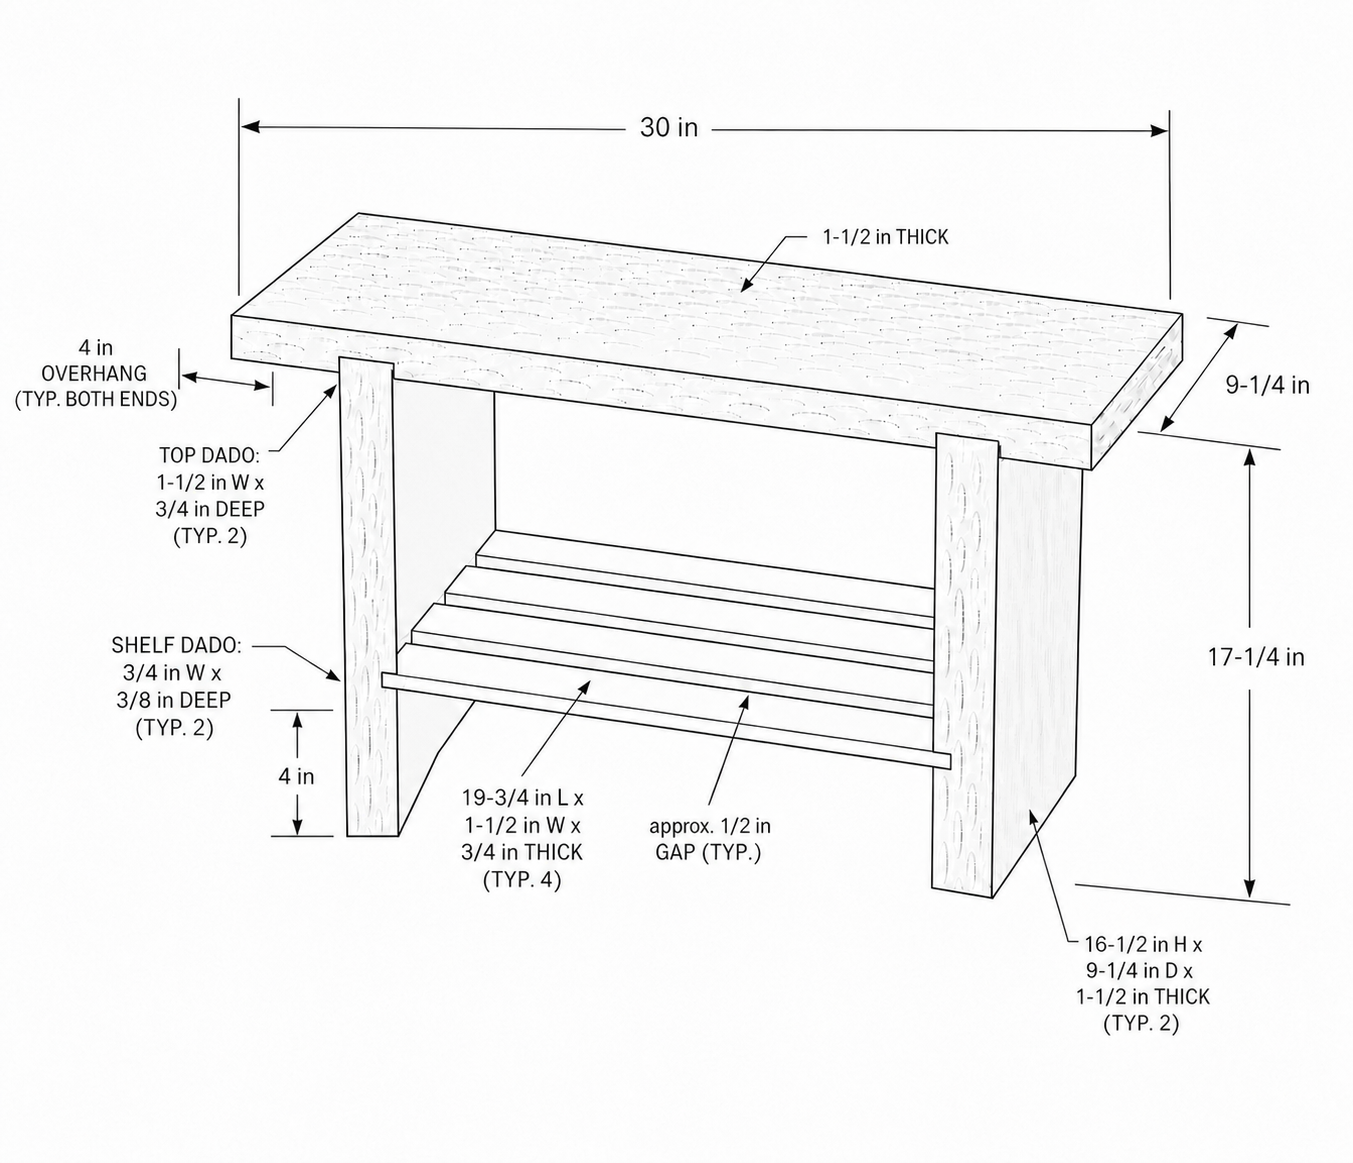
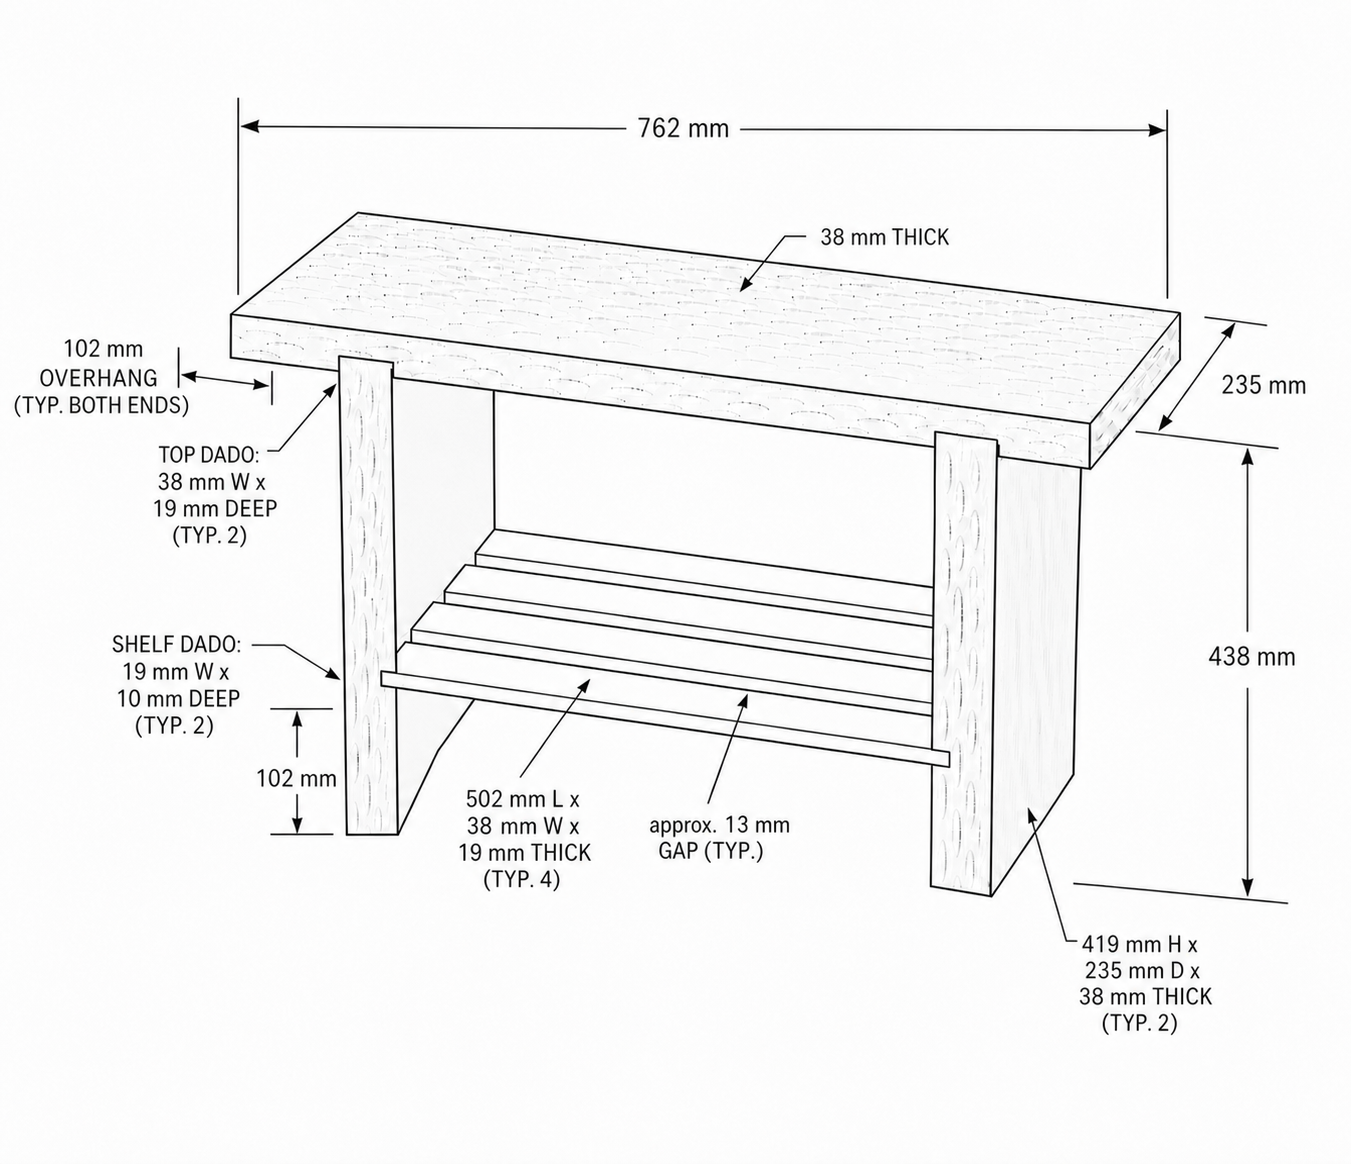
Build steps
Prepare the Main Board
• Cut the pine 2x10x8 down to a 65 in long section. • The extra 2 in allows for saw kerfs and a small cutting buffer. • The remaining offcut is not required for the rest of the build. • Decide which face will become the visible textured surface and mark it clearly with a pencil.
Create the Textured Surface
• This step requires the Maker Mind Router Texture Jig. If you have not built it yet, complete the Maker Mind Router Texture Jig plan before continuing. • Install a 1/2 in cove bit in the router and set the desired cutting depth. • Make a few test passes on scrap wood to confirm the depth and pattern before routing the bench parts. • Route the entire 65 in board before cutting it into the top and side panels. This keeps the texture visually consistent across the finished bench. • Ensure the textured pattern extends beyond all future cut lines. • Align the reference mark on the router jig with the first marked position on the fence. • Turn on the router, allow it to reach full speed, and swing the jig smoothly through its full range to create the first cut. • After each pass, move the router and jig forward by the full distance of the router bit swing. For this setup, the swing distance is 1-1/2 in. • Continue making passes until the entire first row is complete. • Move the workpiece forward 1/2 in to begin the next row. This matches the width of the 1/2 in cove bit. If using a different bit size, move the workpiece forward by the width of that router bit. • For every other row, offset the workpiece by 3/4 in, which is half of the 1-1/2 in swing distance. • Offsetting every other row staggers the texture and creates the desired repeating pattern. • Continue alternating between a standard row and a 3/4 in offset row until the full board is textured. • Keep the router depth, swing motion, fence alignment, and spacing consistent throughout the process. • Brush or vacuum away all chips before cutting the board into its final parts.
Cut the Top and Side Panels
• Measure and mark 16-1/2 in from one end of the textured board. • Use a speed square to draw a square cut line across the full width. • Cut the first side panel using the miter saw. • Place the first side panel against the remaining board and trace its length. • Cut the second side panel and verify that both pieces are the same length. • Cut the remaining section to a final length of 30 in for the top panel. • Mark the intended left side, right side, inside faces, and outside textured faces.
Lay Out the Dados
• Place the 30 in top panel with its bottom, non-textured face facing upward. • From each end, mark lines at 4 in and 5-1/2 in. • These lines create two 1-1/2 in wide dados for the side panels. • Use a speed square to extend each line across the full width of the top panel. • Label the side panels Left Inside and Right Inside before marking the shelf dados. • Stand the panels in their finished mirrored orientation to confirm the correct inside faces. • On each inside face, mark lines 4 in and 4-3/4 in up from the bottom. • Extend both lines across the full width of each side panel. • These lines create the 3/4 in wide dados for the lower shelf slats.
Cut the Dados
• Clamp a straightedge securely to the workpiece for the router to reference. • Install a 3/4 in straight router bit. A smaller bit may also be used but will require additional passes and fence adjustments. • Make test cuts in scrap to confirm the guide position and dado width. • For the top dados, remove material in multiple passes of approximately 3/16 in until reaching a final depth of 3/4 in, which is half the thickness of the top panel. • Reset the straightedge to establish the second wall and complete the full 1-1/2 in dado width. • Repeat the process for the dado at the opposite end of the top panel. • For the shelf dados in the side panels, route between the marked lines to create a 3/4 in wide groove. • Cut each shelf dado in approximately two 3/16 in passes to reach a final depth of 3/8 in. • The shelf dados are only 3/4 in wide because they receive the 3/4 in thick edges of the 1x2 slats. • Repeat the shelf dado on the mirrored inside face of the second side panel. • Feed the router against the bit rotation and follow the router manufacturer safety instructions.
Cut the Shelf Slats
• Cut four pieces from the pine 1x2 board. • Cut each slat to a final length of 19-3/4 in. • Use a stop block or the first finished slat as a reference so all four pieces are the same length. • Lightly ease the exposed top edges of the slats with sandpaper if desired.
Sand the Parts
• Sand the flat faces, sides, edges, and ends of each part using a random orbital sander. • Begin with 80 grit only where needed to remove significant defects. • Continue through 120 and 150 grit before assembly. • Keep the sander moving evenly to avoid creating low spots or changing the dimensions of the joinery. • Do not aggressively sand the textured surfaces. • Lightly hand sand only sharp or splintered areas of the texture so the routed pattern remains crisp.
Dry-Fit the Bench
• Insert both side panels into the dados in the underside of the top panel. • Confirm that each side panel sits fully against the bottom of its dado. • Verify that the completed frame measures approximately 17-1/4 in high. • Insert the four shelf slats into the lower dados. • Arrange the slats from front to back with consistent gaps of approximately 1/2 in. • Align the first slat with the front edges of the side panels. • Use consistent spacer blocks between the remaining slats. • Check the frame for square and confirm that all parts fit properly.
Drill the Assembly Holes
• With the bench dry-fitted, mark two screw locations above each top dado. • Keep the holes centered over the thickness of the side panel and space them evenly across the depth of the top. • Drill pilot holes through the top and into each side panel. • Create a 5/16 in countersink at each location deep enough to recess the screw head and accept a dowel plug. • Keep the drill perpendicular to the top so the screws enter the side panels straight.
Assemble the Bench
• Apply wood glue inside the top dados and along the mating top edges of both side panels. • Seat the side panels fully in the dados and clamp the frame together. • Drive two 2 in wood screws through the top into each side panel. • Keep each screw centered in the thickness of the side panel. • Recheck the frame for square before the glue begins to set. • Apply a small amount of glue inside the shelf dados and on the ends of the shelf slats. • Insert the first slat and align it with the front edges of the side panels. • Drive two 2 in 18-gauge brad nails through the outside of each side panel into each end of the slat. • Position the remaining slats using consistent spacer blocks of approximately 1/2 in. • Nail each end of every slat in place and wipe away excess glue.
Plug the Screw Holes and Final Sand
• Glue a 5/16 in dowel plug into each countersunk screw hole in the top. • Align the grain direction with the top face if you want the plugs to blend more closely. • Allow the glue to cure fully before trimming the plugs flush. • Final-sand the flat surfaces through 180 grit. • Lightly hand sand the textured surfaces only where necessary. • Avoid using the random orbital sander directly on the texture because it can flatten the high points and soften the pattern. • Remove dust carefully from all texture pockets before finishing.
Stain and Finish the Bench
• Apply dark walnut stain evenly to all surfaces of the bench. • Work the stain into the routed texture without allowing excess product to pool in the low areas. • Follow the stain manufacturer instructions for application and drying time. • Apply a second coat only if needed to achieve the desired colour. • Allow the stain to dry fully before applying the clear finish. • Apply one to two even coats of gloss spray lacquer for protection and sheen. • Use light coats and keep the spray moving to avoid runs or heavy buildup inside the texture. • Allow the finish to cure fully before placing the bench into service.
Install Levelling Feet
• This step is optional and is useful if the bench will sit on an uneven floor. • On the bottom end of each side panel, mark one foot location near the front and one near the back. • Position each mark approximately 3/4 in from the nearest edge and centered across the panel thickness. • Drill the required holes according to the threaded insert manufacturer specifications. • Install the four threaded inserts and screw in the levelling feet. • Adjust the feet until the bench sits stable without rocking.
Safety notes
- Wear safety glasses, hearing protection, and appropriate respiratory protection when cutting, sanding, routing, or machining materials.
- Read the entire project plan and confirm all measurements, material sizes, and tool setups before beginning any cuts or assembly.
- Always follow manufacturer safety instructions and use proper safety equipment such as push sticks, guards, clamps, and stable work supports.
- Secure the router jig, fence, workpiece, and straightedge guides before routing, and keep hands clear of the router bit and cutting path.
- Never operate tools while fatigued, distracted, or under the influence, and seek supervision or assistance when using unfamiliar tools or techniques.
- Maker Mind provides informational project guidance only; users are responsible for safe tool operation, verifying measurements, and maintaining a safe workshop environment.
Finishing suggestions
- For a look close to the example build, apply dark walnut stain followed by one to two coats of gloss spray lacquer.
- Apply stain and lacquer carefully inside the routed texture to prevent heavy buildup, runs, or glossy puddles.
- For a more natural appearance, use a lighter stain before applying the clear lacquer.
- If the bench will regularly hold wet shoes, apply an additional protective coat to the shelf slats and lower portions of both side panels.
- Allow the stain and lacquer to cure fully before placing shoes, bags, or other items on the bench.