Modern Walnut Monitor Riser with Keyboard Storage
A modern walnut monitor riser featuring continuous grain orientation, exposed flush-cut dowel joinery, rounded edges, and open storage underneath for a full-size keyboard.
Home Decor · Intermediate · 4–6 hours plus finish drying time
Tools
- Tape Measure
- Pencil
- Combination Square
- Drill
- 3/8 in Drill Bit
- Awl
- Table Saw or Track Saw
- Miter Saw
- Jointer
- Thickness Planer
- Router
- 1/8 in or 1/4 in Roundover Bit
- Flush-Cut Saw
- Random Orbital Sander
- Clamps
- Rubber Mallet
Cut list
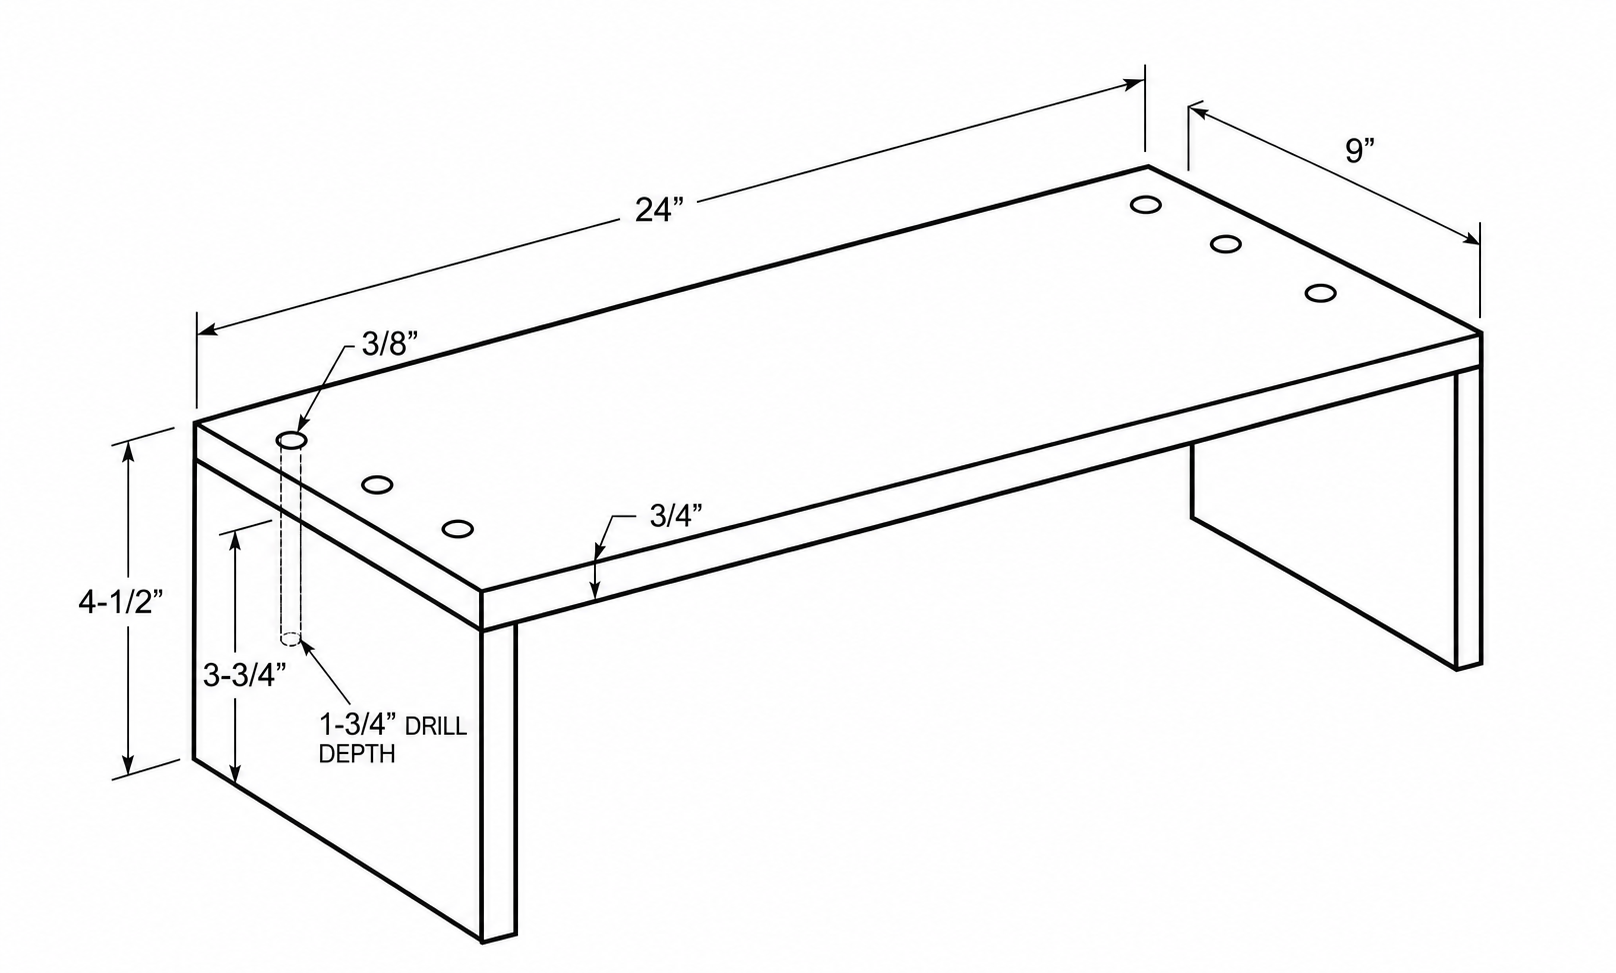
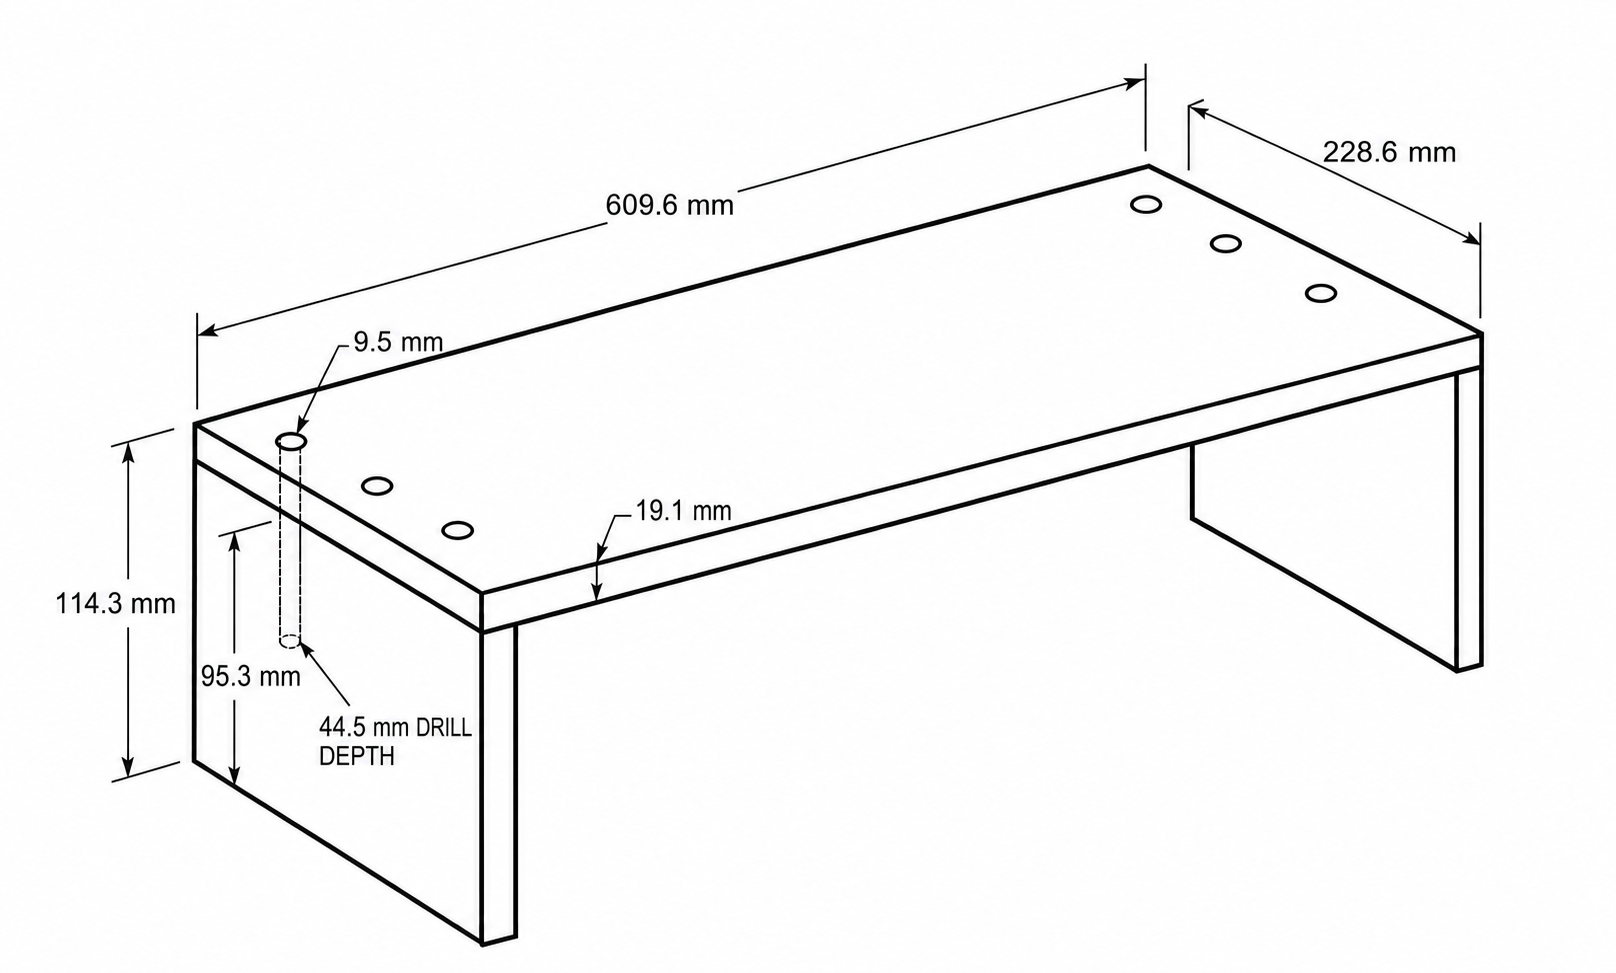
- Top panel — 1 × 24 in W x 9 in D x 3/4 in thick Walnut
- Left side panel — 1 × 9 in D x 3-3/4 in H x 3/4 in thick Walnut
- Right side panel — 1 × 9 in D x 3-3/4 in H x 3/4 in thick Walnut
- Hardwood dowels — 6 × 3/8 in diameter x 2 in long Walnut or matching hardwood
Diagrams
Build steps
Mill and Prepare the Walnut
• If using rough lumber, joint one face of each board until it is flat. • Joint one edge square while holding the flattened face firmly against the jointer fence. • Plane the opposite face until the boards are flat, parallel, and consistently 3/4 in thick. • Rip the remaining rough edge parallel using a table saw or track saw. • If a glue-up is required, arrange the boards for the most attractive grain pattern and create a panel at least 9 in wide x 32 in long. • Apply wood glue to the mating edges and clamp the panel flat using parallel clamps when available. • Allow the glue to cure, remove squeeze-out, and flatten the panel before cutting the final parts.
Cut the Top and Side Panels
• Cut the top panel to 24 in x 9 in using a table saw or track saw for the long cuts and a miter saw or crosscut setup for the ends. • Cut the left side panel from the left end of the remaining walnut panel at 9 in deep x 3-3/4 in high. • Cut the right side panel from the right end so the grain can flow visually from the top into both sides. • Stack the two side panels together and verify that they match exactly in height, depth, and squareness. • Confirm that the top panel measures 24 in x 9 in and that all four corners are square. • Dry-stack one side beneath the top and verify that the finished overall height will be 4-1/2 in.
Cut and Prepare the Dowels
• Cut six pieces of 3/8 in hardwood dowel to 2 in long using a handsaw, bandsaw, or other controlled cutting method. • Mark one end of each dowel as the insertion end. • Lightly chamfer only the insertion end so it enters the drilled joint more easily. • Leave the opposite end square and clean because it will remain visible until it is trimmed flush with the top after assembly. • Keep all six dowels together and verify that their lengths match.
Lay Out the Dowel Locations
• Place the top panel upside down with its underside facing upward. • At both ends of the top panel, mark a centerline 3/8 in in from the edge so the dowels remain centered within the 3/4 in thickness of each side panel. • Along each centerline, mark three dowel locations: 1-1/4 in from the front edge, 4-1/2 in from the front edge, and 1-1/4 in from the back edge. • The rear dowel center will also measure 7-3/4 in from the front edge. • Confirm that the left and right layouts mirror one another. • Use an awl to create a small starting point at all six locations so the drill bit does not wander.
Drill the Dowel Holes
• Position one side panel beneath the corresponding end of the top panel. • Align the side panel flush with the end, front edge, and back edge of the top. • Clamp both pieces securely so they cannot shift during drilling. • Wrap painter tape around the 3/8 in drill bit at 1-3/4 in to create a visible depth reference. • Drill through the top panel and into the side panel at each of the three marked locations. • Keep the drill perpendicular when viewed from both the front and side so the holes remain aligned. • Stop when the depth mark reaches the top surface. • Repeat the same process at the opposite end using the matching side panel.
Dry-Fit and Verify the Riser
• Insert only the middle dowel into each side panel for the dry fit. Using one dowel per side makes the assembly easier to separate before glue-up. • Position both side panels beneath the top and seat the middle dowels in their matching holes without glue. • Confirm that the overall width is 24 in, the depth is 9 in, and the finished height is 4-1/2 in. • Verify that the open keyboard-storage height beneath the top is approximately 3-3/4 in. • Check that both side panels sit flush with the ends of the top and remain square to its underside. • Set the riser on a flat surface and confirm that both side panels contact the surface evenly without rocking. • Label the left and right joint pairs so the same parts return to their matching locations during glue-up.
Glue and Assemble the Riser
• Remove the dry-fit parts and middle dowels. • Apply a small amount of wood glue inside the three dowel holes in the top edge of the first side panel. • Orient each dowel so its chamfered end enters the side panel first and its square end remains exposed. • Tap all three dowels into the side panel with a rubber mallet until fully seated. • Apply a thin, even layer of glue to the top edge of the side panel, the exposed portions of the dowels, and the matching holes in the underside of the top. • Align the side panel with the top and tap the joint together with a rubber mallet until it seats fully. • Repeat the process for the opposite side. • Apply clamp pressure across both ends of the riser until the joints close and a small, even amount of squeeze-out appears. • Use a combination square to confirm that both side panels remain at 90 degrees to the underside of the top. • Remove excess glue with a damp rag before it cures.
Flush the Dowels and Rout the Edges
• Allow the glue to cure fully before removing the clamps. • Use a flush-cut saw to trim the six exposed dowel ends level with the top surface. • Keep the saw blade flat and avoid scratching the walnut around the dowels. • Install a 1/8 in or 1/4 in roundover bit in the router. • Rout the exposed edges of the top and side panels while leaving the inside mating corners untouched. • Keep the router moving consistently to avoid burn marks in the walnut. • Lightly hand sand the routed profiles to remove machining marks without flattening their shape. • Check that the roundover remains consistent along the front and side edges where it is most visible.
Final Sand the Monitor Riser
• Sand all flat surfaces using 120-grit sandpaper. • Continue through 180 and 220 grit for a smooth furniture-ready surface. • Keep the random orbital sander moving continuously across the top to avoid creating dips. • Hand sand the roundovers, inside corners, and areas around the flush-cut dowels. • Avoid aggressive sanding around the dowels because it can create visible low spots in the top. • Place the riser on a flat surface after sanding and confirm that it still sits without rocking. • Remove all sanding dust before applying finish.
Apply the Finish
• Test the chosen finish on a walnut offcut before applying it to the completed riser. • Apply the finish evenly to the top, sides, inside surfaces, and underside edges. • Avoid allowing excess finish to collect in the inside corners. • Follow the finish manufacturer instructions for application, drying time, and recoating. • If required, lightly scuff between coats using 220-grit sandpaper. • Apply finish to the bottom edges of both side panels so moisture movement remains more balanced. • Allow the finish to cure fully before placing a monitor on top or sliding a keyboard underneath.
Safety notes
- Wear safety glasses, hearing protection, and appropriate respiratory protection when cutting, sanding, routing, or machining materials.
- Read the entire project plan and confirm all measurements, material sizes, and tool setups before beginning any cuts or assembly.
- Always follow manufacturer safety instructions and use proper safety equipment such as push sticks, guards, clamps, and stable work supports.
- Never operate tools while fatigued, distracted, or under the influence, and seek supervision or assistance when using unfamiliar tools or techniques.
- Maker Mind provides informational project guidance only; users are responsible for safe tool operation, verifying measurements, and maintaining a safe workshop environment.
Finishing suggestions
- For a natural modern appearance, apply a hardwax oil that leaves the walnut with a low-sheen finish and remains easy to maintain.
- For additional protection and a slightly richer walnut colour, use a satin wipe-on polyurethane.
- Sand through 220 grit before finishing and avoid an overly glossy topcoat if you want a clean contemporary appearance.
- Test the finish on an offcut first because walnut can darken noticeably depending on the product.
- Allow the finish to cure fully before placing a monitor or keyboard on the riser.